


Managing receipts is a significant part of business operations. QuickBooks, a leading accounting software, offers a range of features to streamline this process.
The integration of tools like Shoeboxed with QuickBooks is a straightforward process, automating receipt capture, upload, and organization, and providing a sense of ease and simplicity.
What receipts should be added to QuickBooks?

Tracking various types of receipts in QuickBooks is crucial for maintaining accurate financial records, complying with tax laws, and preparing for audits. This underscores the importance of this task in the business process.
Here’s a list of receipts to add to QuickBooks:
1. Sales receipts
Customer Sales: Receipts from sales transactions with customers. These should include the item sold, date, price, and any applicable taxes.
Online Sales: Receipts from online sales platforms like Shopify, Amazon, or eBay. Make sure these include transaction fees and shipping costs.
2. Expense receipts
Office supplies: Receipts for office supplies like stationery, printer ink, and other consumables.
Utilities: Bills and receipts for utilities like electricity, water, internet, and phone services.
Travel expenses: Receipts for business travel, including airfare, hotel stays, car rentals, meals, and other travel-related expenses.
Meals: Receipts for business meals and entertainment expenses. These should include the date, location, and purpose of the meal.
Professional services: Receipts for services rendered by professionals like accountants, lawyers, and consultants.
3. Purchase receipts
Inventory: Receipts for inventory purchases, raw materials and finished goods.
Equipment: Receipts for business equipment like computers, printers, and machinery.
Software: Receipts for software purchases or subscriptions used in business.
4. Operational receipts
Rent: Receipts for office or retail space rent payments.
Insurance: Receipts for business insurance premiums like general liability, property, and health insurance for employees.
Licenses and permits: Receipts for fees paid to obtain or renew business licenses and permits.
5. Employee expense receipts
Payroll: Records of employee payroll and related expenses.
Reimbursements: Receipts for expenses reimbursed to employees like travel, meals, and office supplies.
Training and development: Receipts for courses, workshops, and other professional development activities for employees.
6. Marketing and advertising receipts
Advertising: Receipts for online ads, print ads, and other marketing campaigns.
Promotional materials: Receipts for business cards, brochures, and other promotional materials.
7. Miscellaneous receipts
Bank fees: Receipts for bank charges and fees associated with business accounts.
Shipping costs: Receipts for postage and courier services used to send products or documents.
Subscriptions: Receipts for industry-related magazine subscriptions, memberships, and online services.
When should you add receipts to QuickBooks?
Adding receipts to QuickBooks in a timely and organized manner is important for accurate financial records and business operations.
Here’s a guide on when to add receipts to QuickBooks:
1. Immediately after the transaction
Best practice: As soon as you receive a receipt from a purchase or sale, add it to QuickBooks. This way no receipts are lost and your records are up-to-date.
Benefit: Keeps your financial data current, which is important for real-time financial tracking and decision-making.
2. Daily updates
Routine: Spend a few minutes at the end of each business day to enter all receipts for that day into QuickBooks.
Benefit: Prevents a backlog of unrecorded receipts and reduces the risk of losing or misplacing any receipts.
3. Weekly review
Weekly routine: If daily entry is not possible, set aside specific time each week to enter all collected receipts into QuickBooks.
Benefit: Weekly updates keep your financial data relatively current and manageable, and reduces the hassle of entering a large number of receipts at once.
4. Before reconciliation
Monthly reconciliation: Enter all receipts for the month before you do your monthly bank reconciliation.
Benefit: Reconciliation requires all transactions, like expenses and sales to be recorded. This way your QuickBooks records match your bank statements.
5. Before tax filing
Tax preparation: Before you file your quarterly or annual taxes, review and add any outstanding receipts.
Benefit: Complete and accurate records help you to claim all eligible deductions and comply with tax laws..
6. After big transactions
Big purchases or sales: Add receipts for major transactions like big equipment purchases or big sales.
Benefit: These transactions impact your financial statements and should be added as soon as possible to keep it accurate.
Where do you add receipts in QuickBooks?
Adding receipts to QuickBooks keeps your financial records current.
Here’s a step-by-step guide on three methods you can use to add receipts to QuickBooks:
QuickBooks Online
-
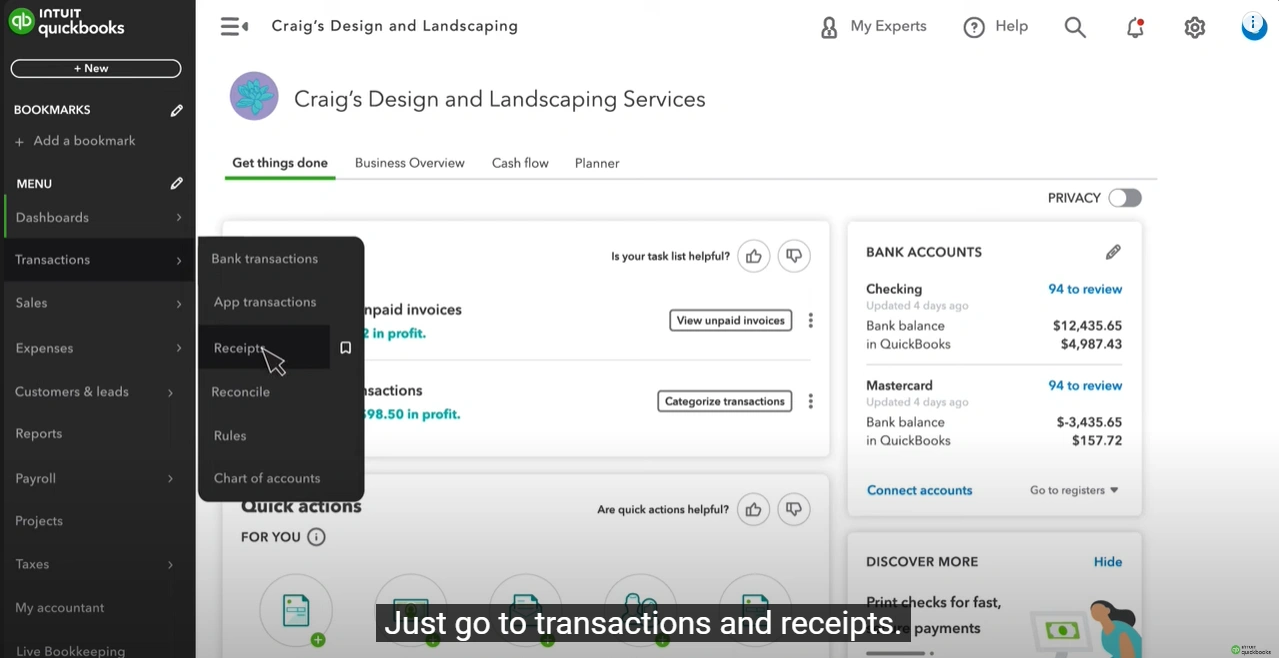
Receipts tab
Navigation: Log in to QuickBooks Online, go to the left-hand menu, and click on “Banking” or “Transactions.”
Receipts: Click on the “Receipts” tab.
Upload receipts: Click on the “Upload” button to upload receipts from your computer. You can drag and drop files or browse to select them.
-
Attach receipts to transactions
Match transactions: In the “Banking” section, you can find the transactions and attach receipts directly to them by clicking on the transaction and then selecting “Attach receipt.”
-
QuickBooks Mobile App
Capture receipts: Open the QuickBooks mobile app and use the receipt capture feature. Take a photo of the receipt, and the app will automatically extract and upload the information to your QuickBooks account.
QuickBooks Desktop
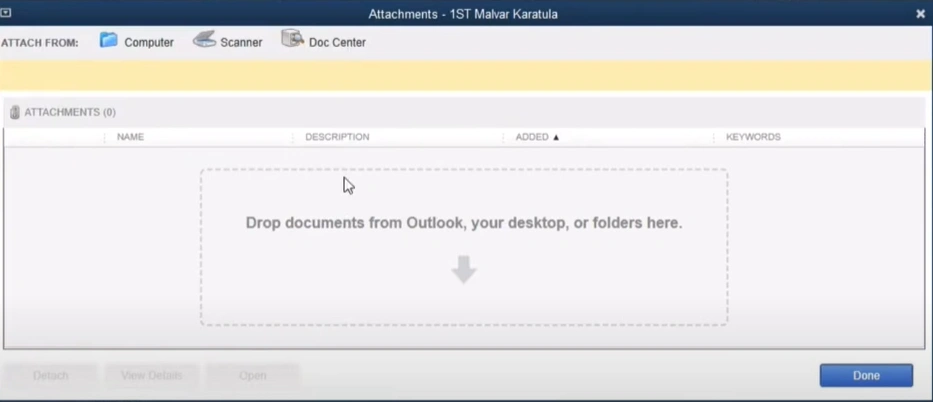
-
Attach documents center
Navigation: Open QuickBooks Desktop and go to the “Company” menu.
Attach documents: Select “Documents” and then “Attach Documents.” Here, you can scan and attach receipts to specific transactions or bills.
-
Using the QuickBooks Scan Manager
Set up Scan Manager: Go to the “Documents” menu, select “Doc Center,” and set up QuickBooks Scan Manager.
Scan receipts: Use the Scan Manager to scan and attach receipts directly to transactions in QuickBooks Desktop.
Shoeboxed x QuickBooks
-
Sync Shoeboxed with QuickBooks
Integration setup: Make sure your Shoeboxed account is connected to QuickBooks. Go to Shoeboxed settings, find the integration options, and connect it with your QuickBooks account.
Automatic sync: Once integrated, receipts captured in Shoeboxed will automatically sync with your QuickBooks account, categorized and ready for review.
-
Upload via Shoeboxed app
How do you add receipts to QuickBooks?
Here’s how to add receipts to QuickBooks.
1. Use the QuickBooks mobile app
The QuickBooks mobile app allows you to upload receipts directly from your smartphone.
Download and install: Make sure you have the QuickBooks mobile app installed on your device.
Capture receipt: Open the app and use the camera to take a photo of the receipt.
Add receipt: Select ‘add receipt’. The app will extract date, amount, and vendor using OCR technology.
Save and categorize: Save the receipt and categorize it in your QuickBooks account.
2. Upload receipts from your computer
If you have digital copies of receipts stored on your computer, you can easily upload them to QuickBooks.
Login to QuickBooks: Log into your QuickBooks account through a web browser.
Go to receipts: Go to the "Banking" or "Transactions" menu and select "Receipts."
Upload receipt: Click on "Upload" and select the receipt files from your computer. QuickBooks will match the receipts to the transactions.
3. Use Shoeboxed to add receipts to QuickBooks
Shoeboxed makes capturing and organizing receipts easy and uploading to QuickBooks a breeze.
While QuickBooks is great accounting software, many users prefer to use a dedicated receipt management solution (E.g., Shoeboxed) that integrates with QuickBooks to manage their receipts.
Read on for how to use Shoeboxed with your QuickBooks account for an optimized receipt management experience.
Capture receipts with Shoeboxed

Use Shoeboxed to scan your receipts. Take a picture of your receipt using your mobile device's camera and the Shoeboxed mobile app. The app automatically uploads the data into your Shoeboxed account.
Use the desktop upload feature
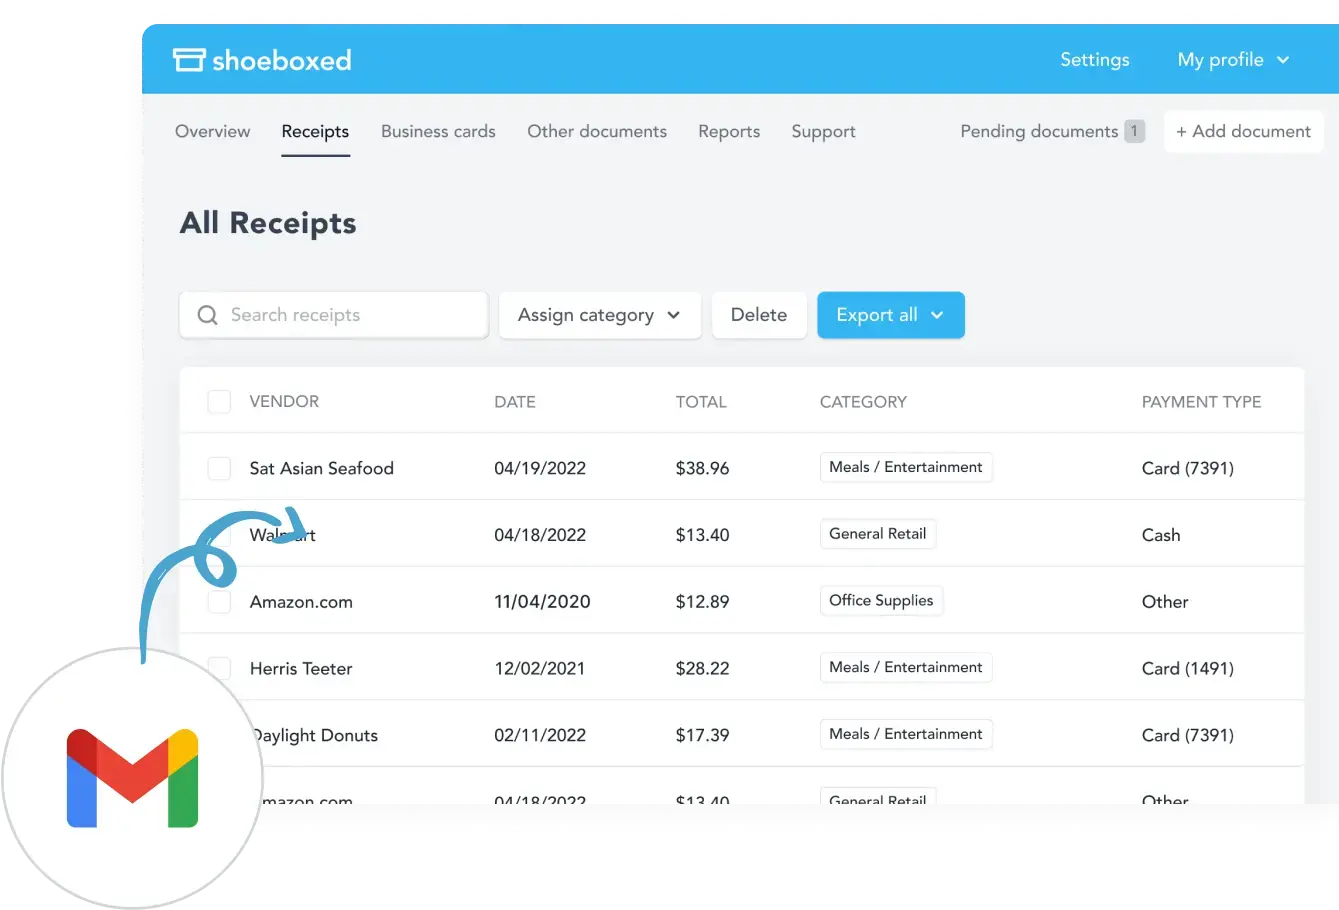
Auto-import digital receipts to your account with Shoeboxed's Gmail plug-in or forward email receipts to your Shoeboxed account. You can also drag and drop multiple receipts into the cloud using your laptop or desktop.
Mail-in service option

Or, Shoeboxed offers a mail-in service. Send your receipts in a pre-paid Magic Envelope, and Shoeboxed will scan and upload them for you.
Shoeboxed’s OCR technology extracts and categorizes data
Stop doing manual data entry 🛑
Outsource receipt scanning to Shoeboxed’s scanning service and free up your time for good. Try free for 30 days!✨
Get Started Today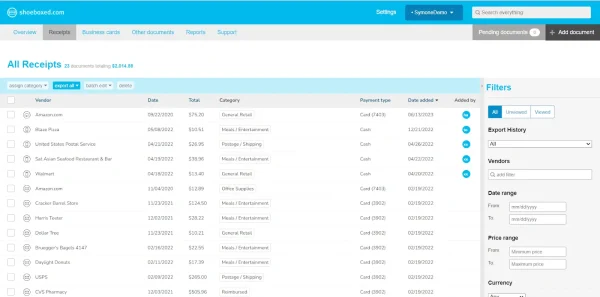
Shoeboxed’s OCR (Optical Character Recognition) automatically categorizes your receipts based on the extracted data.
You can create custom categories to organize receipts according to your needs, such as travel, office supplies, etc.
Integration with accounting software

Shoeboxed integrates with popular accounting software, such as QuickBooks, Xero, and many more, so you can sync your receipts to your accounting system.
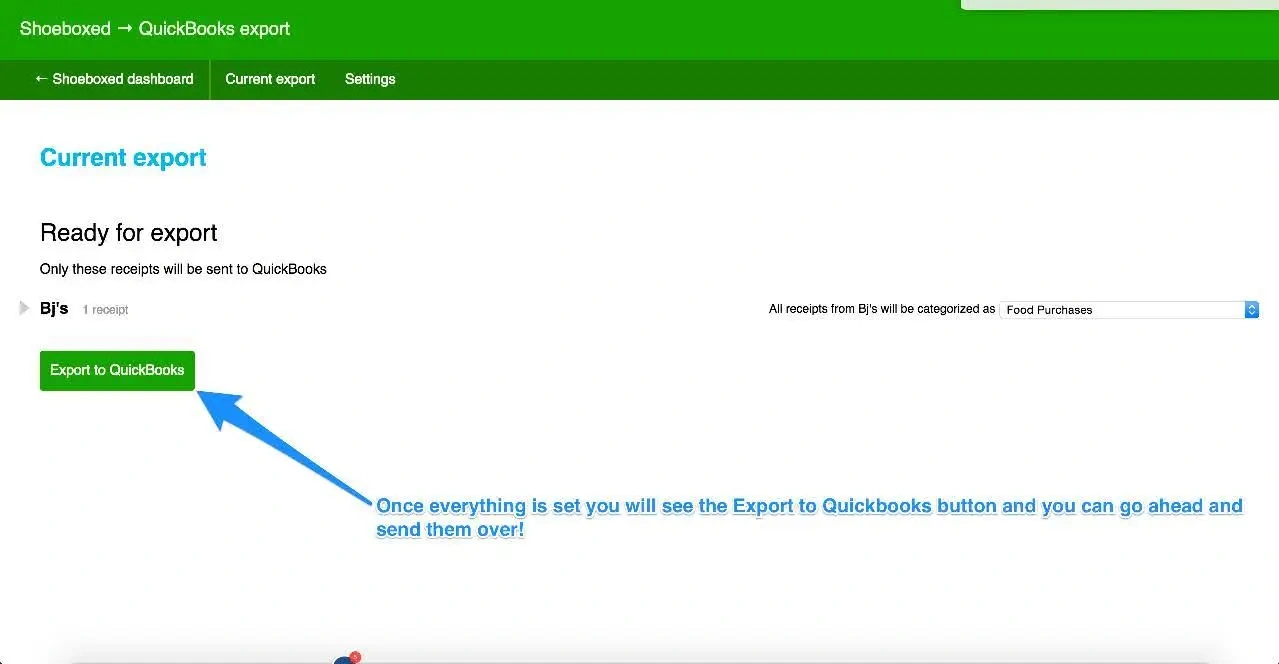
Sync Shoeboxed with QuickBooks
Sync Shoeboxed with QuickBooks by going to Shoeboxed’s settings and find the integration options. Choose ‘QuickBooks’ among the options.
Once integrated, receipts captured in Shoeboxed will automatically sync to your QuickBooks account, categorized and ready for review.
Turn receipts into data with Shoeboxed ✨
Try a systematic approach to receipt categories for tax time. Try free for 30 days!
Get Started TodayHow to match a receipt with a transaction in QuickBooks
Matching receipts to transactions in QuickBooks ensures your financial records are accurate and complete.
Here’s how:
Step 1: Upload the receipt
-
QuickBooks mobile app:
Open the QuickBooks app on your smartphone.
Tap on the “Receipt Capture” button.
Take a photo of the receipt. QuickBooks will extract date, amount, and vendor using OCR.
Save the receipt. It will upload to your QuickBooks account.
-
QuickBooks Online:
Log in to your QuickBooks Online account.
Go to the “Banking” or “Transactions” tab.
Select “Receipts” and click “Upload”.
Drag and drop the digital receipt files from your computer or browse to upload.
Step 2: Review transactions
-
Go to transactions:
Go to the “Banking” tab.
Select the bank account where the transaction was recorded.
-
Find the transaction:
Look for the transaction that matches the receipt. You can use filters to search by date, amount, or vendor.
Step 3: Match the receipt to the transaction
-
Select the transaction:
Click on the transaction to open it.
-
Match the receipt:
In the transaction details, you will see an option to “Attach” or “Match” a receipt.
Click on this option and select the uploaded receipt from the list.
-
Confirm the match:
Review the details to make sure the receipt matches the transaction.
Click “Save” or “Match” to finish.
Step 4: Check the match
-
Reconcile:
Go to the “Reconcile” section in QuickBooks.
Make sure the transaction with the matched receipt shows up in the reconciliation.
-
Reports:
Run expense reports or transaction reports to see that all receipts are matched and recorded.
Why is it important to add receipts to QuickBooks?
Adding receipts in QuickBooks is important for any business and has many benefits for financial management and compliance.
Here’s why:
1. Accurate records
Keeping accurate records is important for any business. By adding receipts in QuickBooks, you ensure all transactions are recorded. This gives you a complete record to back up your financial statements so you can track and manage your expenses.
2. Tax compliance
Stored receipts are important during tax season. They are proof for deductions and expenses claimed on tax returns and help avoid tax authority issues. QuickBooks organizes these receipts for you so they are ready for tax time and audits.
3. Audit-ready
In the event of an audit, having receipts in QuickBooks makes it easy. It provides the documentation auditors require and reduces the time and stress of audits.
4. Expense tracking
QuickBooks allows you to categorize and track expenses. By adding receipts, you ensure every expense is accounted for and you have visibility into where your money is going. This helps with budgeting and financial planning.
5. Fraud Prevention
Having detailed records of receipts helps you identify any discrepancies or unauthorized expenses so you can prevent fraud. QuickBooks can help monitor and flag unusual transactions for review.
Frequently asked questions
1. Can I upload multiple receipts at once in QuickBooks?
Yes, you can upload multiple receipts at once by selecting multiple files during the upload process. QuickBooks will process each receipt individually and extract and categorize the data.
2. How does Shoeboxed ensure the accuracy of receipt data?
Shoeboxed uses advanced OCR technology to extract data from receipts. Their team also manually verifies the scanned data to ensure accuracy. This two-step process reduces errors and ensures the data synced to QuickBooks is correct.
In conclusion
Adding receipts in QuickBooks is important for accurate records. The QuickBooks mobile app, web interface, and integrations like Shoeboxed can simplify this process, reduce manual data entry, and ensure compliance. Now, you can focus on what you do best—running your business.
Caryl Ramsey has years of experience assisting in different aspects of bookkeeping, taxes, and customer service. She uses a variety of accounting software for setting up client information, reconciling accounts, coding expenses, running financial reports, and preparing tax returns. She is also experienced in setting up corporations with the State Corporation Commission and the IRS.
About Shoeboxed!
Shoeboxed is a receipt scanning service with receipt management software that supports multiple methods for receipt capture: send, scan, upload, forward, and more!
You can stuff your receipts into one of our Magic Envelopes (prepaid postage within the US). Use our receipt tracker + receipt scanner app (iPhone, iPad and Android) to snap a picture while on the go. Auto-import receipts from Gmail. Or forward a receipt to your designated Shoeboxed email address.
Turn your receipts into data and deductibles with our expense reports that include IRS-accepted receipt images.
Join over 1 million businesses scanning & organizing receipts, creating expense reports and more—with Shoeboxed.
Try Shoeboxed today!
